Step 1: Know the “Essentials”
Four areas must first be addressed to most efficiently begin a build:
- Deposit Account: Bank account to receive payments.
Check if the desired bank account is in Portal by going to Inventory > Account Codes, clicking + NEW ACCOUNT CODE, and clicking Select a Deposit Account… If not listed, contact support@revtrak.zendesk.com.
- Account Code: Routes payment to the appropriate revenue accounts and deposits into the assigned bank account. An item can only be assigned one account code and each account code can only be assigned one deposit account. Account codes should be entered in a uniform format (all either without spaces, with spaces, dashes, or periods, etc.) to avoid duplicate entries such as 1.0.111 and 1-0-111. The given example leaves room for erroneous deposit account assignment if the Portal has more than one deposit account. Items built for the code containing numbers “1011” may also be unintentionally split in assignment between the variants, thereby detrimentally impacting reconciliation efficiency.
Check for desired code by typing/pasting the code into the Full Code column’s search field (below the column title). Click the filter icon next to the column’s search field to change the filter type (recommended: “contains”).
- Reporting Department: Used to organize items in administrative reports. Departments are separate entities from account codes and deposit accounts. To include multiple items in a single report, each of the desired items must be assigned the same Reporting Department (example: a program’s shirt, donation, and sponsor items all report to “ProgramName”). To have separate reports for different groupings of items, the departments may need to be more specific to easily differentiate (example: program shirt reports to “ProgramName Apparel” and program donations report to “ProgramName Donations”). We recommend excluding years from department names as that setup would require new departments added each year.
- Group: Organizes items in logical groupings to assist purchasers in locating fees. Districts with multiples campuses are typically organized by campus and single-campus districts are organized by departments. When building items, we recommend using a designated “review” group.
Step 2: Set the Foundation
Please complete the following before creating the item:
- Deposit Account – Check for desired account and if not listed, contact support@revtrak.zendesk.com.
- Account Code – Check for desired code and if not listed, create new.
- Reporting Department – Check for desired department and if not listed, create new.
- Group – Check if desired Web Store structure exists and if not, create framework.
Step 3: Build the Item
Once the four areas are confirmed, begin the item build.
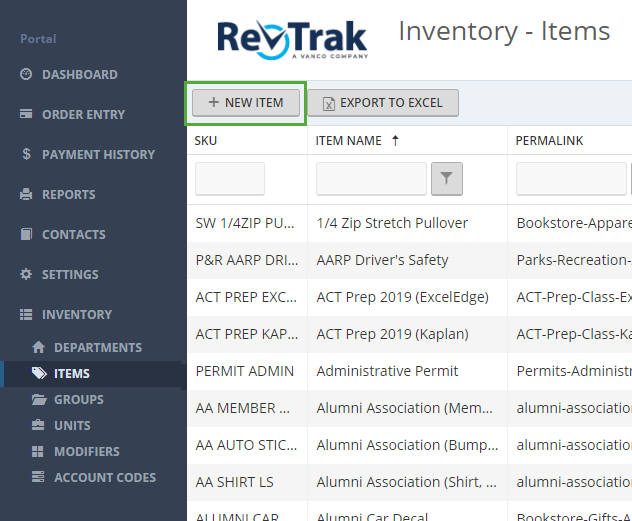
Click Inventory > Items. In the top-left corner of the light blue strip, click + NEW ITEM.
The item editor popup will display, defaulting to the Basic Setup tab.
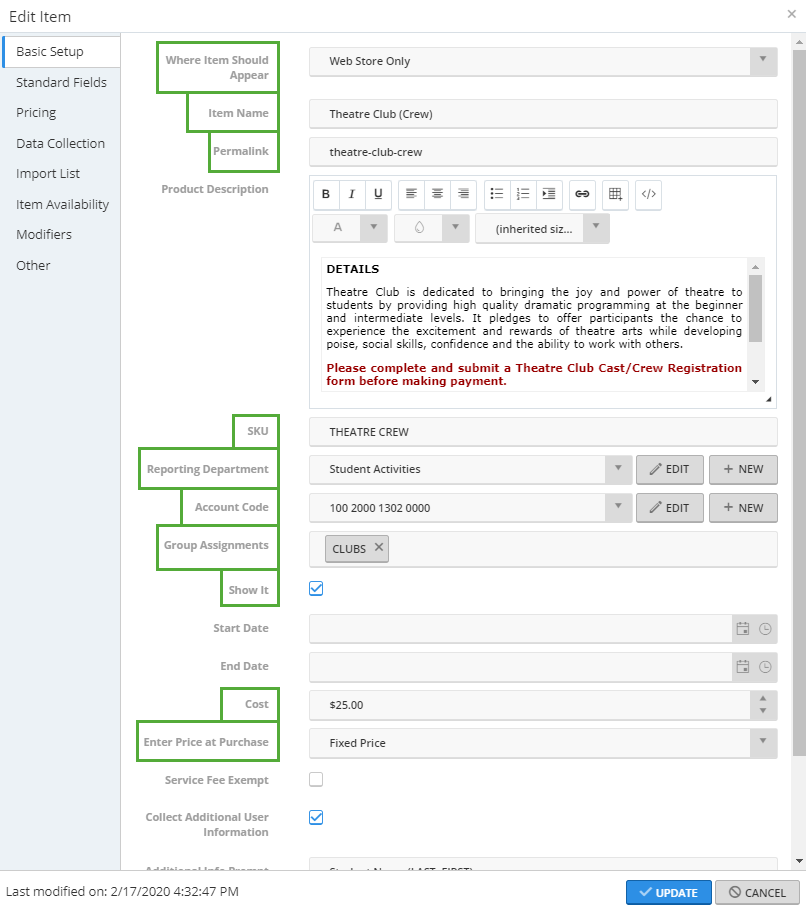
The Basic Setup tab contains the essential fields to create a functional item.
- Where Item Should Appear: Determines which system(s) to show the item. There are three options: (1) Everywhere, meaning the same SKU will list in Web Store and Order Entry; (2) Web Store Only; and (3) Order Entry Only. Choosing “Everywhere” limits settings to those only compatible with Order Entry. If settings need to be different than what’s specified, create two items: one Web Store and one Order Entry.
- Item Name
- Permalink: A static URL stub that automatically populates as an item name is entered. This “stub” appears after the group’s permalink stub once live on the Web Store (Example: https://yourdistrict.revtrak.net/clubs/theatre-club-crew).
- SKU
- Reporting Department
- Account Code
- Group Assignment
- Show It: Check the box to show the item (start/end dates will override this feature when it’s enabled). If un-checked, the item will not be listed for purchase (overrides start/end dates).
- Cost: Base price of item ($0 and up). This field always must have a value to properly display for purchasers. The price will change for the end user if a modifier with price adjustment is used.
- Enter Price at Purchase: There are four options. The first is used most often.
- (1) Fixed price = Static base cost. Must pay in full.
- (2) Enter Price at Purchase = Open adjustable amount.
- (3) Balance fixed = Static balance that must be paid in full. Used with an import list for account balance lookup. Balance is updated by import.
- (4) Balance = Adjustable balance. Used with an import list for account balance lookup. Balance is updated by import.